Showing posts with label recipe. Show all posts

Tuesday, September 6, 2011

Light, easy dinner

Looks good, no?

I don't think my prep time every matches that on the recipe. I must be slow and/or not very efficient. I left out the following items ... I'm sure you aren't surprised: hot sauce (would have added, but didn't want to buy it just for this), cilantro, shallot. I also used a box of Garden Delight tomato, carrot & spinach pasta instead of the whole-wheat pasta. It came in a 12oz. box, so I added left over penne pasta in my cabinet to get the pound. You'd be fine with just the 12oz. box!
** UPDATE: Clearly my eyes only see what they want to when it comes to my favorite carbs. I honestly never saw that the recipe called for just 1/2 of a 1lb. box of pasta until Molly pointed it out to me. No wonder it made so much! Stick with just half the box, or the 12oz. box for more pasta in the gazpacho. **

Cooked pasta. So pretty looking!

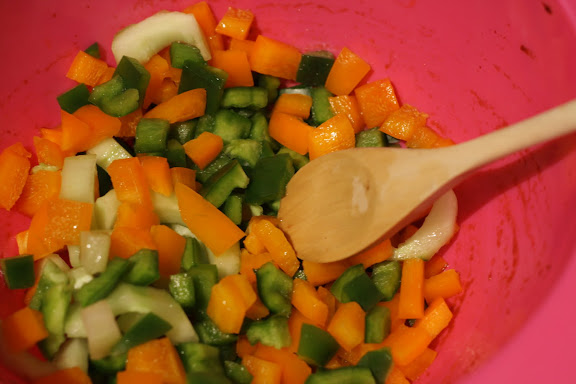
Diced veggies. I used a whole cucumber. I also used an orange bell pepper instead of yellow because it looked better at the grocery store. I forgot to add the cherry tomatoes until after I mixed the pasta in this.

Easy dressing. I thought this wouldn't be enough, but it was plenty. The final (gazpacho) product is less soup-y & more pasta salad-y.

My portion for dinner. This made a HUGE amount! I ate this bowl, gave some to a neighbor, packed some for Mitzi & Brenda & me for lunch tomorrow, and have 2 more portions left for future meals.

Oh, and I dirtied up just about every utensil and bowl in my kitchen!

Enjoy!

Pin It!

Monday, July 5, 2010

Easy snack/dessert recipe

We have treat day at school once a month and our lovely PTO provides lunch once a month & meals during both Fall & Spring conference week. Several times a year, someone brings in a yummy matzo chocolate treat. I've always known it was easy to make, but never tried it. Until this week ...

Matzo Toffee:
* 2 cups coarsely crumbled matzos {I used more like 3.5 cups, I'll explain further down}
* 1 1/2 cups sliced almonds {the bag I bought was 1 2/3 cups, so I just used all of that}
* 1/2 cup (1 stick) unsalted butter
* 1/2 cup packed light-brown sugar
* 1/2 teaspoon salt
* 2 cups semisweet chocolate chips

Step 1:
Preheat oven to 325. Line a large rimmed backing sheet with parchment {I had to use Pam'd foil, because I'm not the kind of girl that has parchment in my kitchen}. In a bowl, toss matzo pieces with almonds.
{I knew I wanted to take this snack to my condo's 4th of July BBQ, so I wanted to make extra. I didn't have enough ingredients to double my recipe, so I just increased the recipe by 50%. So in this bowl, you see about 3 cups of matzo and all the almonds I had.}

Step 2:
In a saucepan, bring butter, brown sugar, salt, and 2 tablespoons of water to a boil over medium, stirring constantly. {While this started boiling almost immediately, it didn't get to the toffee consistency for a few minutes.}

Step 3:
Working quickly, drizzle matzo mixture with syrup and toss. {I did increase all these ingredients, but didn't realize until this step that I didn't really need to increase the syrup mixture. It was WAY TOO MUCH syrup, even when I added more matzo at the last minute.}

Step 4:
Using a heatproof spatula, spread mixture onto a prepared sheet. Bake until golden, about 30 minutes. {This is where I really noticed I had too much syrup. I should have put the mixture on 2 cookie sheets, but didn't have 2 with rims. It had a hard time setting up.}

Step 5:
Remove from oven; sprinkle with chocolate chips. Let chocolate melt five minutes. {You do NOT need to increase the amount of chocolate chips. The original amount would have been plenty.}

Step 6:
Spread chocolate over matzo toffee after the 5 minutes have passed. {I ended up scraping a lot of the chocolate off & storing in a small bowl for some other something. It would be nice to have some of the toffee showing through.}

Step 7:
Refrigerate until chocolate has set. Break into pieces and serve. To store, refrigerate in an airtight container, up to 5 days.)

Great (and fairly easy) snack. I would either stick to the original recipe, minimize the amount of syrup anyway, or use my tips for increasing the amount. Would make a great house-warming or holiday party gift.

Pin It!

Friday, June 25, 2010

Yummy lunch or snack!

I actually planned on making certain recipes when I went to the grocery store last week. It makes my shopping so much easier, but when I get home, I actually have to set aside time to make said recipes.

This time it was Tiny Tuna Melts. I LOVE a good tuna melt, and love tiny foods ... so what's not to like? These were so easy, those of you with kids could have them help!

Gather the following ingredients:
* 1 can (3 ounces) of tuna, drained
* 1 tablespoon mayonnaise
* 2 teaspoons fresh lemon juice (I only had the fake stuff)
* coarse salt & ground pepper
* small crackers (melba toast, wheat thins, etc.)
* 1/4 cup shredded cheddar


Step 1:
Stir together can of tuna, mayo, lemon juice. Season with salt & pepper.

Step 2:
Heat broiler of toaster oven (or oven). On a foil-lined baking sheet, arrange 16 small crackers. Top with tuna mixture and cheese.


Step 3:
Broil until cheese has melted, 2-3 minutes. Serves 2.


YUMMY! Enjoy!

Pin It!

Friday, April 30, 2010

Yes, I realize it's almost summer ...

... and I realize people don't really eat chili in the summertime, but I still wanted to share this recipe!

It's one of my favorites and it's super healthy, too! Chili Mac. I found it on the Weight Watchers recipe share page years ago, and I always come back to it. I've changed a few things from the original recipe, so I'll make those notes, too.

Ingredients:
* 12 oz ground beef. {I use ground turkey and whatever amount comes in the tray in the meat section. I don't worry about the ounces too much.}
* 1 medium onion chopped {For some reason, I've been buying a red onion all this time. Don't know if it makes a difference.}
* 14.5 oz can of stewed tomatoes, Mexican style, undrained.
* 2 Tbsp canned green chili peppers, diced & undrained. {These come in a small can & I usually just pour the whole can in.}
* 2 tsp chili powder.
* 1 tsp ground cumin {I add more for extra flavor.}
* 1 cup dry wheat elbow pasta. {I use regular Radiatore pasta because I think it adds some extra weight to the chili.}
* 15 oz can of kidney beans, rinsed & drained.
* 1 1/4 cup canned tomato sauce. {You have to buy 2 small cans and I put both in.}


In a skillet, cook meat & onions until they are browned (about 10 minutes). {I use my large "pasta" pot since I don't have a skillet large enough for all of this.}

Then, stir in stewed tomatoes, tomato sauce, chili peppers, chili powder and cumin. Bring to a boil.

The stir in your pasta and kidney beans. Return to a boil, reduce heat and simmer for 15 minutes.

I can normally portion this out into 5 or 6 servings and the little servings fill you up for a long time. Weight Watchers says that a 1 1/4 cup serving is 4 WW points. That might be a bit off since I don't use wheat pasta, but I do use ground turkey, which should help that.
Enjoy! I'm sure this all freezes well, too if you wanted to cook in advance. Let me know what you think about it if you do decide to make this yummy Chili Mac! :)

Pin It!

Friday, July 4, 2008

Rhubarb Crisp: Step-by-step

A while back, I blogged about Molly making some yummy rhubarb crisp, and many of you seemed interested! The recipe comes from Martha's Everyday Foods (of course) and it fairly easy to make! I'm not a good cook, by any means, and if I can make it, you can, too!

So, about two weeks ago, Molly and I spent a few hours in the kitchen cooking away. I took pictures at the time, and now I finally have a chance to share them!

The beginning! Aren't these colors gorgeous together? We decided to mix this crisp with strawberries, too. I don't think I've ever seen rhubarb in the raw form before. It looks like celery, and I just cut it up into small pieces. This is a 9x9 pan just for reference.

Sprinkled with sugar only (I think) at this point. It really got the juices to start coming out of the fruit. See those onions in the bottom? Those were roasted and were really good, too!

Combine brown sugar, flour, cinnamon and oats at this point. Stir up as best as you can.

Add some small bits of butter to that mixture and sprinkle it to cover the fruit. Those are my hands! See? I can bake!! :)

The finished product! SOOOOOOO good. I recommend to enjoy when it is still a little bit warm, and with vanilla ice cream or frozen yogurt.

I wanted to also include pictures from the rest of the cooking that went on.

This is the cabbage that I took apart leaf by leaf and cleaned. Isn't it beautiful! I love the range of green colors that unfolded with each layer.

And here is the slaw I made with it. We added dried cranberries, apple chunks, maybe some nuts and a poppyseed dressing. It was really good!

Here is Molly slaving away at the stove!

She asked Erik to bring home some chicken breasts to pan fry and he brought 4 of the biggest pieces of chicken we've ever seen! She had to pound them down to get thin enough for her to cook correctly. It took 2 big pans to do it, but it was REALLY good!

Here's the third member of our cooking team. He's watching the TV to make sure that it doesn't spontaneously explode and cause smoke to come into the kitchen so we can no longer cook. He was a HUGE help! ;)

Hmmmm ... after I've written all of this, I think it's time to make it all again! I'll see what sorts of fruits and veggies I pick up from their local farmers today!

Pin It!